Kubernetes Intro
Kubernetes
容器基础
容器技术的核心功能,就是通过约束和修改进程的动态表现,从而为其创建出一个“边界”
容器,其实是一种特殊的单进程模型而已
同一台机器上的所有容器,都共享宿主机操作系统的内核
1 | # Cgroups技术用来限制 |
Cgroups
1
2
3
4
5
6
7
8
9
10
11
12
13
14
15
16
17
18
19
20
21
22# Linux Cgroups是Linux内核中用来为进程设置资源限制的一个重要功能
# Linux Cgroups全称 Linux Control Group,主要作用就是限制进程组能够使用的资源上限,CPU、内存、磁盘、网络带宽
➜ mount -t cgroup
cgroup on /sys/fs/cgroup/systemd type cgroup (rw,nosuid,nodev,noexec,relatime,xattr,name=systemd)
cgroup on /sys/fs/cgroup/perf_event type cgroup (rw,nosuid,nodev,noexec,relatime,perf_event)
cgroup on /sys/fs/cgroup/cpu,cpuacct type cgroup (rw,nosuid,nodev,noexec,relatime,cpu,cpuacct)
cgroup on /sys/fs/cgroup/devices type cgroup (rw,nosuid,nodev,noexec,relatime,devices)
cgroup on /sys/fs/cgroup/net_cls,net_prio type cgroup (rw,nosuid,nodev,noexec,relatime,net_cls,net_prio)
cgroup on /sys/fs/cgroup/rdma type cgroup (rw,nosuid,nodev,noexec,relatime,rdma)
cgroup on /sys/fs/cgroup/blkio type cgroup (rw,nosuid,nodev,noexec,relatime,blkio) -- 为块设备设置I/O限制,一般用于磁盘等设备
cgroup on /sys/fs/cgroup/memory type cgroup (rw,nosuid,nodev,noexec,relatime,memory) -- 为进程设置内存使用限制
cgroup on /sys/fs/cgroup/hugetlb type cgroup (rw,nosuid,nodev,noexec,relatime,hugetlb)
cgroup on /sys/fs/cgroup/cpuset type cgroup (rw,nosuid,nodev,noexec,relatime,cpuset) -- 为进程分配单独的CPU核和对应的内存节点
cgroup on /sys/fs/cgroup/freezer type cgroup (rw,nosuid,nodev,noexec,relatime,freezer)
cgroup on /sys/fs/cgroup/pids type cgroup (rw,nosuid,nodev,noexec,relatime,pids)
➜ ls /sys/fs/cgroup/cpu
cgroup.clone_children cpuacct.usage cpuacct.usage_percpu_user cpu.cfs_quota_us init.scope system.slice
cgroup.procs cpuacct.usage_all cpuacct.usage_sys cpu.shares kubepods.slice tasks
cgroup.sane_behavior cpuacct.usage_percpu cpuacct.usage_user cpu.stat notify_on_release user.slice
cpuacct.stat cpuacct.usage_percpu_sys cpu.cfs_period_us docker release_agentDocker vs Hypervisor
1
21. 用户运行在容器里的应用进程根宿主主机上的其他进程一样,都由宿主主机操作系统同一管理,只不过这些被隔离的进程拥有额外设置过的Namesapce参数, 而Docker项目在这里扮演的角色更多的是旁路式的辅助和管理工作
2. Hypervisor虚拟化作为应用沙盒,必须由Hypervisor负责创建虚拟机,这个虚拟机真实存在,并且运行完整的GuestOS才能执行用户的应用进程.容器化
1
2
3
4> Dockerd实际上是在创建容器进程时,指定进程所需要启动的一组Namespace参数,这样,容器只能“看”到当前Namespace所限定的资源、文件、设备、状态、或配置,而对于宿主机以及其他不相关的程序,就完全看不到
"敏捷"和"高性能"是容器相较于虚拟机最大的优势,也是它能够在PaaS这种更细粒度的资源管理平台上大行其道的重要原因.
- 容器和应用的同生命周期Docker镜像
1
2
3
4
5
6
7Docker镜像的设计中引入层layer,用户制作镜像的每一步操作都会生成一个层,也就是一个增量rootfs
Union File System 联合文件系统
将多个不同位置的目录联合挂在(Union mount)到同一个目录下
overlay2
overlay2, which has potential performance advantages over the aufs storage driver.容器
是由Linux Namespace、Linux Cgroups和rootfs第三种技术构建出来的进程隔离环境
Linux容器
1
2
3
4
5
6
7
8
9
> 一组联合rootfs
> 一组Namespace + Cgroups 构成的隔离环境
- Docker: Compose+Swarm
- Google+ReadHat: KubernetesKubernetes全局架构
1
2
3
4
5
6
7
8
9
10
11
12
13
14
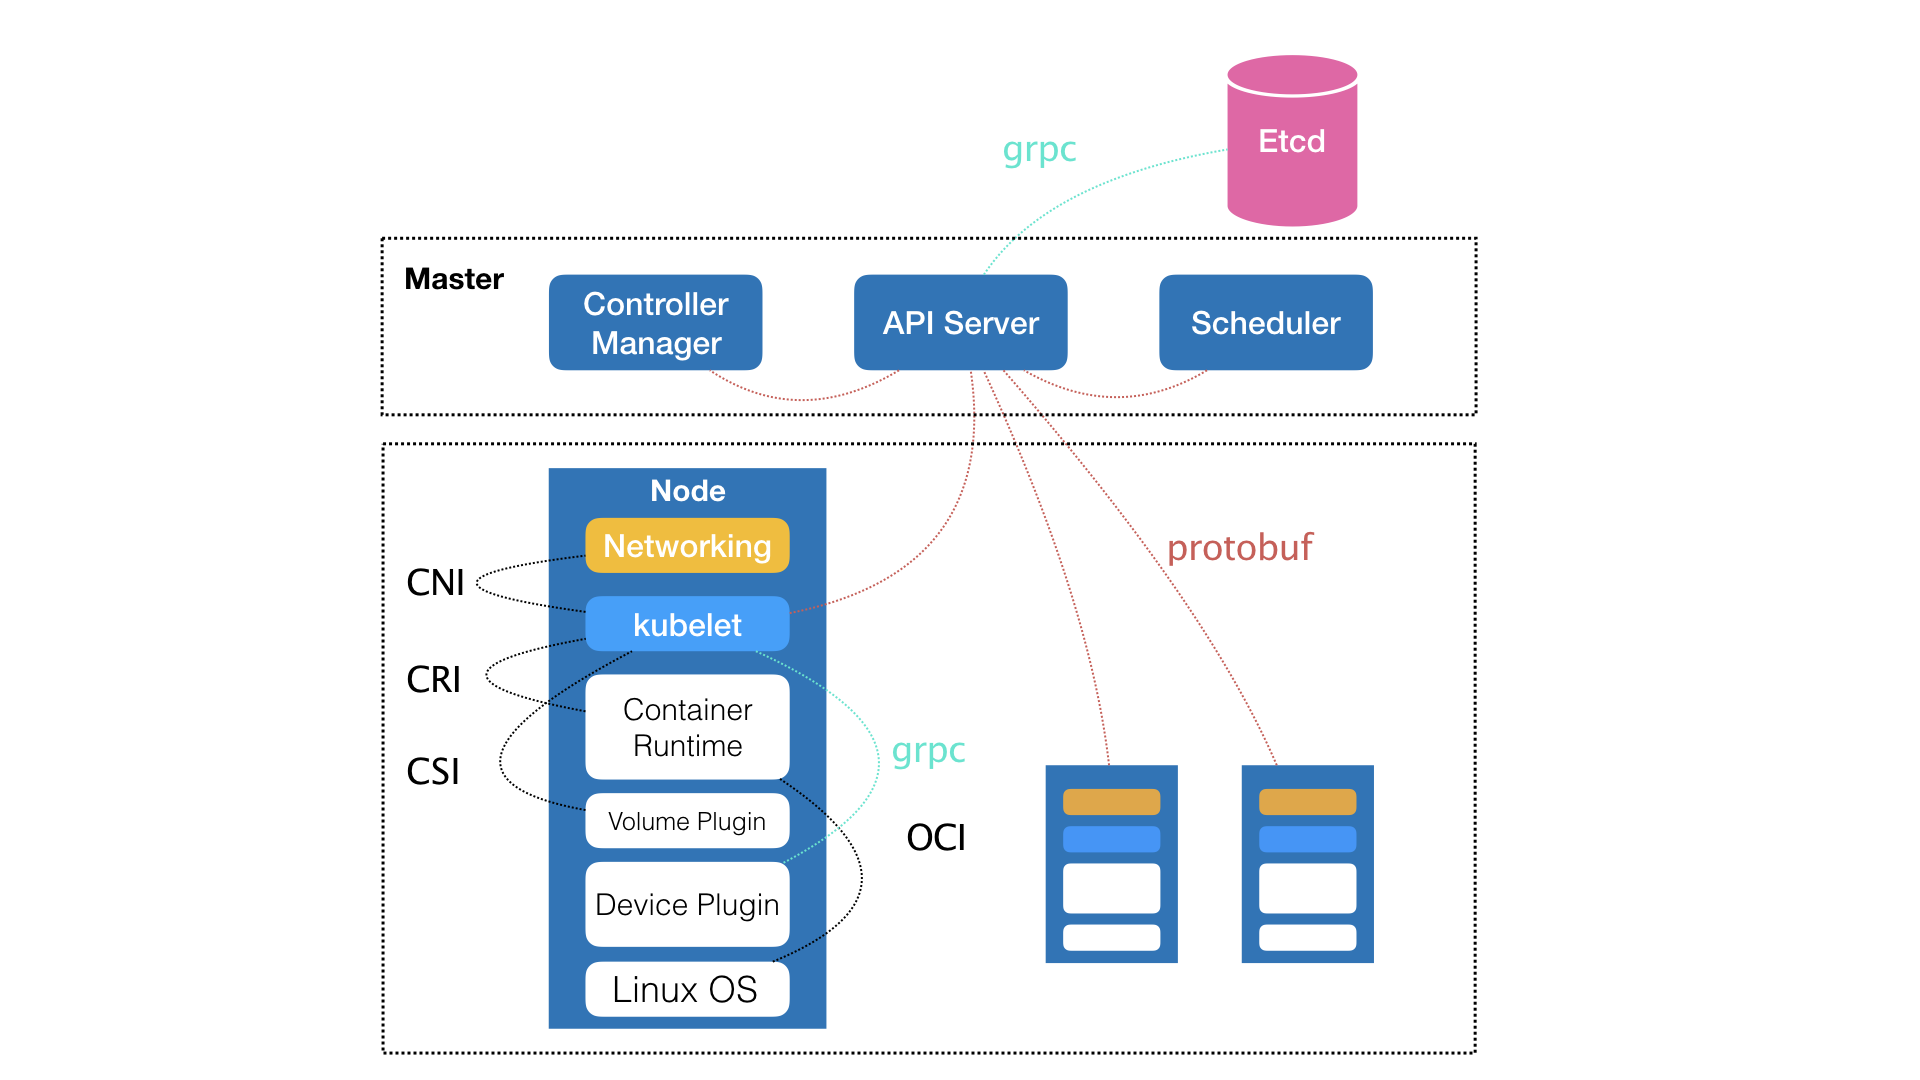
15- Master(控制节点):
> 如何编排、管理、调度用户提交的作业
- kube-controller-manager: Controller Manager
- kube-apiserver: API Server (整个集群的持久化数据由kube-apiserver处理后保存在Etcd中)
- kube-scheduler: Scheduler
- Node(计算节点):
- kubelet: kubelet主要责任同容器运行时(docker)交互
- CNI : kubelet + Networking - 网络插件为容器配置网络
- CRI : kubectl + Container Runtime Interface (接口定义容器运行时的各项核心操作)
- CSI : kubectl + Volume Plugin - 存储插件为容器持久化存储
- OCI : Container Runtime Interface (容器运行时规范同底层Linux操作系统进行交互, 即将CRI请求翻译成Linux系统操作调用 Namespace + Cgroups)
- grpc: kubelet + Device Plugin (Kubernetes项目管理宿主主机物理设备的主要组件)
> Kubernetes项目关心解决的问题是"运行在大规模集群中的各种任务之间,实际上存在着各种各样的关系,这些关系的处理,才是作业编排和管理系统最困难的地方"Kubernetes 核心功能
1
2
3
4
5
6
7
8
9
10
11
12
13
14
15
16
17
18
19
20
21
22
23
24
25
26
27
28
29
30
31
32
33
34
35
36
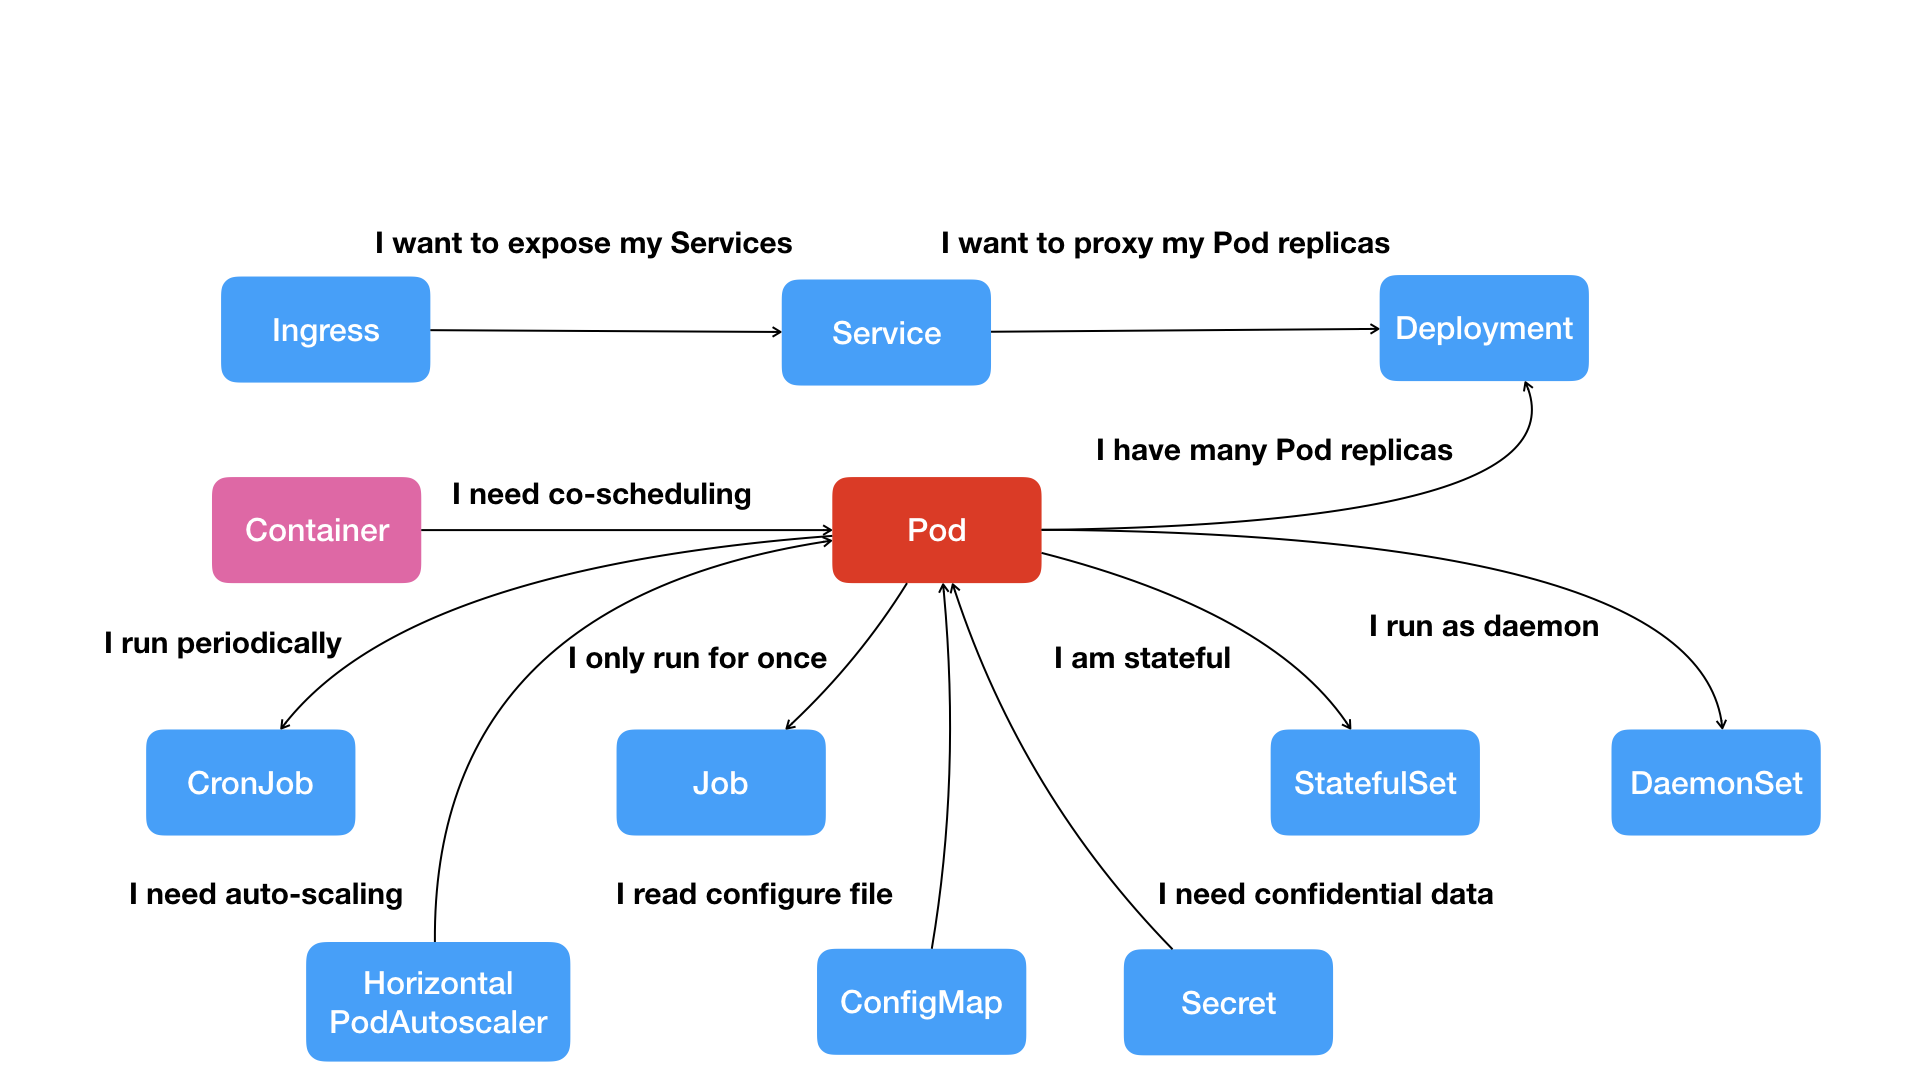
37> Kubernetes项目的本质是为用户提供一个具有普遍意义的容器编排工具
> Pod里的容器共享同一个Network Namespace,同一组数据卷,从而达到高效交换信息的目的
> Pod就是Kubenetes世界里的"应用",而一个应用,可以由多个容器组成
> Service服务作为Pod代理入口(Portal)从而代替Pod对外暴露一个固定的网络地址
> Pod多实例管理器
> Secret对象是保存在Etcd里的键值对数据
> 描述一次性运行Pod
> 描述定时任务
> 描述每个宿主机上必须且只能运行一个副本的守护进程服务
- Pod
- Job
- CronJob
- Service
- Secret
- Horizontal Pod Autoscaler(自动水平扩展器)
> 这种API对应的"编排对象"和"服务对象"都是Kubernetes项目中的API对象(API Object)
Kubernetes 概念
- 概述
- Kubernetes是什么

1
2
3
4
5
6
7
8
9
10
11
12
13
14
15
16
17
18
19
20
21
22
23
24
25
26
27
28
29
30
31
32
33
34
35
36
37
38
39
40
41
42
43
44
45> Kubernetes 是一个可移植的,可扩展的开源平台,用于管理容器化的工作负载和服务,可促进声明式配置和自动化.
> Kubernetes源于希腊语,意为"舵手"或"飞行员"
> Kubernetes建立在Google在大规模运行生产工作负载方面拥有十几年的经验的基础上,结合社区中最好的想法和实践.
# 传统部署时代:
- 资源分配问题
# 虚拟化部署时代:
- 虚拟化技术允许在单个物理服务器的CPU上运行多个虚拟机VM,虚拟化允许应用程序在VM之间隔离,并提供一定成都的安全,因为一个应用程序的信息不能被另一个应用程序随意访问
- 虚拟化技术能够更好的利用物理服务器上的资源,因为可轻松地添加或更新应用程序而可以实现更好的可伸缩性,降低硬件成本
- 每一个VM是一台完整的计算机,在虚拟化硬件之上运行所有组件,包括其自己的操作系统
# 容器部署时代:
- 容器类似于VM,但是具有被放宽的隔离属性,可以在应用程序之间共享操作系统OS
- 容器与VM具有自己的文件系统、CPU、内存、进程空间
- 容器的好处:
- 敏捷应用程序的创建和部署: 与使用VM镜像相比,提高容器镜像创建的便捷性和效率
- 持续开发、集成和部署: 通过快速简单的回滚(由于镜像不可变性),支持可靠且频繁的容器镜像构建和部署
- 开发与运维的分离: 在构建/发布时而不是在部署时创建应用程序容器镜像,从而将应用程序于基础架构分离
- 可观察性: 显示操作系统级别的信息和指标,显示应用程序的运行状态和其他指标信号
- 跨开发、测试和生产的环境一致性: 在便携计算机上与云中相同地运行
- 跨云和操作系统发型版本的可移植性: 可在Ubuntu,RHEL,CoreOS,本地
- 以应用程序为中心的管理: 提高抽象级别,从在虚拟硬件上运行OS到使用逻辑资源在OS上运行应用程序
- 松散耦合、分布式、弹性、解放的微服务: 应用程序被分解成较小的独立部分,并且可以动态部署和管理-而不是在一台大型单机上整体运行
- 资源隔离: 可预测的应用程序性能
- 资源利用: 高效率和高密度
# Kubernetes 提供功能:
- 服务发现和负载均衡
- 存储编排
- 自动部署和回滚:
- 自动完成装箱计算:
> Kubernetes 允许指定每个容器所需CPU和内存RAM 当容器指定资源请求时,Kubernetes可以做出更好的决策来管理容器资源
- 自我修复
- 密钥与配置管理:
> Kubernetes存储和管理敏感信息
# Kubernetes 不提供:
- 不限制支持的应用程序类型: Kubernetes支持及其多种多样的工作负载,包括无状态、有状态和数据处理工作负载。如果应用程序可以在容器中运行,那么他应该可以在Kubernetes上很好的运行.
- 不部署源代码,也不构建应用: 持续集成CI、交付和部署CI/CD工作流
- 不提供应用程序级别的服务作为内置服务
- 不提供日志记录、监控或报警解决方案: 提供一些集成作为概念证明并提供收集和到处指标的机制
- 不提供不采用任何全面的机器配置、维护、管理或自我修复系统
> Kubernetes 不仅仅是一个编排系统,实际上消除了编排的需要,编排的技术定义是执行已定义的工作流程,首先执行A,然后执行B,在执行C,Kubernetes包含一组独立的,可组合的控制过程,这些过程联系地将当前状态驱动到所提供状态,如何从A到C的方式无关紧要,也不需要几种控制,使得系统更易于使用且功能更强大、系统更健壮、更为弹性和扩展性. - Kubernetes 组件

1
2
3
4
5
6
7
8
9
10# Control Plane Compoenents 控制平面组件
> 控制平面组件对集群做出全局决策(调度),以及检测和响应集群事件
> 控制平面组件可以在集群中的任何节点上运行
- kube-apiserver:
> 该组件公开Kubernetes API, API服务器是Kubernetes控制面的前端
> 运行kube-apiserver多个实例并在这些实例之间平衡流量
- etcd:
> etcd 是兼顾一致性和高可用性的键值数据库,作为保存Kubernetes所有集群数据的后台数据库 - PV、PVC、StorageClass
1
2
3
4
5
6
7
8
9
10
11
12
13
14
15
16
17
18
19
20
21
22
23
24
25
26
27
28
29
30
31
32
33
34
35
36
37# Kubernetes 容器持久化存储
- PV: 持久化存储的实现
> 持久化存储数据卷,定义的是一个持久化存储在宿主主机上的目录
- PVC: 持久化存储的接口
> 描述的持久化存储的属性 (Volume存储大小,可读写权限)
> PVC必须和某个符合条件的PV进行绑定
- 1. PV 和 PVC 的spec字段, PV的存储(storage)大小,必须满足PVC的要求
- 2. PV 和 PVC 的storageClassName字段必须一样
- Volume Controller: 持久化存储控制器
- PersistentVolumeController:
> 不断查看当前每一个PVC是否已经处于Bound状态,如果不是,就会遍历所有的、可用的PV,尝试将其PVC进行绑定
# 持久化Volume
- 远程文件存储
- NFS
- GlusterFS
- 远程快存储
- 公有云提供的远程磁盘
# 准备"持久化"宿主机目录
- 第一阶段 (Attch) -- nodeName
> 默认情况下,kubelet 为 Volume创建的目录是 /var/lib/kubelet/pods/<Pod的ID>/volumes/kubernetes.io-<Volume类型>/<Volume名字>
> AttachDetachController (运行在Master节点上)
- 第二阶段 (Mount) -- dir
> 格式化磁盘设备,然后将其挂在到宿主机指定的挂载点上
> VolumeManagerReconciler (运行在Node节点上,是一个独立于kubelet主循环的goroutine)
# StorageClass:
> Kubernetes 提供一套可以自动创建PV的机制,Dynamic Provisioning
> 手动创建PV的方式叫做 Staic Provisioning
> StorageClass的作用就是创建PV的模板
- 1. PV的属性 (存储类型、Volume大小)
- 2. 创建PV需要用到的存储插件(Ceph, NFS)
> Kubernetes根据用户提交的PVC,找到对应的StorageClass,然后调用该StorageClass声明的存储插件,创建出需要的PV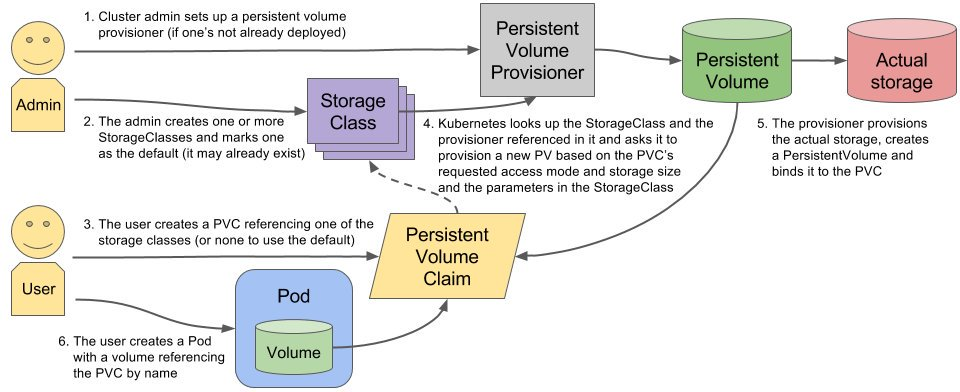
- 搭建StorageClass + NFS
1
2
3
4
5
6
7
8
9
10
111. 创建一个可用的NFS Server
IP: 172.30.1.14
Export PATH: /export/K8sData/
$ sudo apt-get install nfs-common cifs-utils
2. 创建Service Account. 管控NFS Provisioner在K8s集群中运行的权限
3. 创建StorageClass.负责建立PVC并调用NFS provisioner进行预定的工作,并让PV与PVC建立管理
4. 创建NFS Provisioner,在NFS共享目录下创建挂载点(volume),建立PV并将PV与NFS的挂在点建立关联
- 搭建StorageClass + NFS
- Kubernetes是什么
部署Kubernetes
kubeadm
1
2
3
4
5
6
7
8
9
10
11
12
13
14
15
16
17
18
19
20
21
22
23
24
25
26
27
28
29
30
31
32
33
34
35
36
37
38
39
40
41
42
43
44# 创建一个Master节点
$ kubeadm init
# 将一个Node节点加入当前集群
$ kubeadm join <Master节点的IP和端口>
# kubeadm 工作原理
- kubelet 是Kubernetes项目用来操作Docker等容器运行时的核心组件,除了跟容器运行时交互外,kubelet在配置容器网络、管理容器数据卷时,都需要直接操作宿主机.
> Kubeadm选择一种妥协方案,把kubelet直接运行在宿主机上,然后使用容器部署其他的Kubernetes组件.
# kubeadm init工作流程
- 1. Preflight Checks 检查工作, 确定机器可以用来部署Kubernetes
- Linux Kernal必须>= 3.10
- Linux Cgroups 模块是否可用
- 机器的hostname是否标准
- 安装的kubeadm和kubelet版本是否匹配
- 机器上是不是已经安装Kubernetes二进制文件
- Kubernetes工作端口10250/10251/10252端口是否占用
- ip, mount Linux指令是否存在
- docker是否安装
- 2. 生成 kubernetes对外提供服务所需要的各种证书和目录
- Kubernetes对外提供服务时,除非专门开启"不安全模式",否则都要通过HTTPS才能访问kube-apiserver,需要kubernetes集群配置证书文件
- /etc/kubernetes/pki (kubeadm为kubernetes项目生成的证书文件)
- 3. kubeadm为其他组件生成访问kube-apiserver所需的配置文件
- /etc/kubernetes/xxx.cnf
- 4. kubeadm为Master组件生成Pod配置文件
- kube-apiserver
- kube-controller-manager
- kube-scheduler
- ETCD
> 在Kubernetes中,特殊的容器启动方法"Static Pod",允许把要部署的Pod的YAML文件放在一个指定的目录里,当kubelet启动时会自动检查次目录,加载所有的PodYAML文件
- 5. kubeadm检查localhost:6443/healthz 等待Master组件完全运行起来
- 6. kubeadm为集群生成一个bootstrap token.
- 剩余的Node节点可以通过此token加入到集群中
- 7. 安装插件kube-proxy和DNS
- kube-proxy: 集群的服务发现
- DNS:
# kubeadm join工作流程
- bootstrap token
> kubeadm至少需要发起一次"不安全模式"的访问kube-apiserver,从而拿到保存在ConfigMap中的cluster-info(保存了APIServer的授权信息),而bootstrap token扮演的就是这个过程中的安全验证角色
# kubeadm部署参数配置文件(kubeadm.yaml)
$ kubeadm init --config kubeadm.yamlinstalling kubeadm, kubelet and kubectl
1
2
3- kubeadm: the command to bootstrap the cluster
- kubelet: the component that runs on all of the machines in your cluster and does things like starting pods and containers.
- kubectl: the command line util to talk to your clustercontainer runtimes
1
2
3
4
5
6
7
8
9
10
11
12
13
14
15
16
17
18
19
20
21
22
23
24
25
26
27
28
29
30
31
32
33# common container runtimes:
- containerd
- CRI-O
- Docker
# Cgroup(Control groups) drivers:
> used to constrain(限制) resources that are allocated to processes.
> Changing the settings such that your container runtime and kubelet use systemd as the cgroup stabilized the system.
# Cgroup V2
> is the next version of cgroup Linux API.
- cleaner and easier to use API
- safe sub-tree delegation to containers
- newer features like Pressure Stall Information
# Migrating to the systemd driver in kubeadm managed clusters
- Docker:
sudo mkdir /etc/docker
cat <<EOF | sudo tee /etc/docker/daemon.json
{
"exec-opts": ["native.cgroupdriver=systemd"],
"log-driver": "json-file",
"log-opts": {
"max-size": "100m"
},
"storage-driver": "overlay2"
}
EOF
- Restart Docker and enable on boot:
sudo systemctl enable docker
sudo systemctl daemon-reload
sudo systemctl restart dockerkubeadm部署
kubeadm目前欠缺部署高可用Kubernetes集群,ETCD、Master组件都应该是多节点集群
1 | # 创建一个Master节点 (--image-repository指定容器镜像地址使用阿里云) |
kubernetes CNI (Container Network Interface)
1
2
3
4
5
6
7
8
9
10
11
12
13
14
15
16
17
18
19
20
21
22
23
24
25
26
27
28
29
30
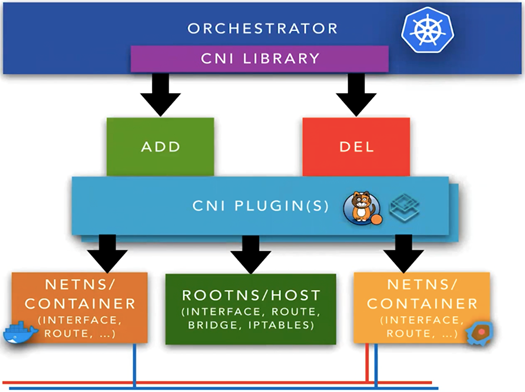
31> Kubernetes supports CNI plugins for the communication between pods.
> kubeadm does not support kubenet. you should use a CNI plugin
# Kubernetes impose(施加) following rules for network communication:
- All containers can communicate with all other containers without NAT
- All nodes can communicate with all container (and vice-versa) without NAT
- The IP that a container sees itself as is the same IP that others see it as.
CNI plugins generally use kube-proxy or directory iptables for routing. However, Cilium is based on BPF and XDP to provide a faster and more scalable option.
# Plugins:
- Flannel:
- provides VXLAN tunneling solution 隧道解决方案
- configuration and management are very simple
- does not support Network Policies
- Calico:
- default choice of the most of kubernetes platform (kubespary, docker enterprise)
- uses BGP and Bird, a daemon called Felix configures routes on Bird
- supports IP-IP encapsulation if BGP cannot be used.
- supports Network Policies
- uses iptables for routing but it can be configured to use kube-proxy's IPVS mode.
- Weave:
- Provides VXLAN tunneling solution
- all of the nodes are connected as mesh which allows it to run on paritially connected networks.
- stores configuration files on pods instead of kubernetes CRDs or etcd
- has an encryption library
- supports Network Policies
- Cilium
- Linux kernel must be at least 4.9
- kube-router:
-- Terminology
- kube-proxy
- Kube-proxy tree mods: 三个模组
- userspace:
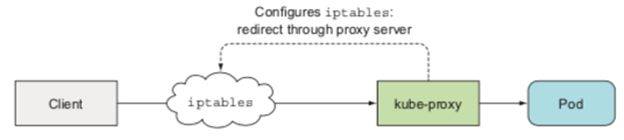
1
> It adds rules to iptables so that all communication redirects through proxy server. It is no longer used since it is much slower compared to the other modes.
- Iptables:
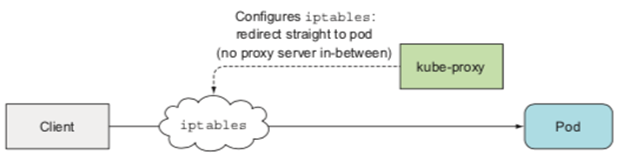
1
> This mode adds rules to iptables so that iptables redirects straight to pods without using a proxy server. It is the default mode of kube-proxy.
- IPVS:
1
IPVS (IP Virtual Server) is layer-4 load balancer inside the Linux kernel. It is built on top of netfilter like iptables. It utilizes hash table instead of chain as in iptables.
- userspace:
- Kube-proxy tree mods: 三个模组
- Network policy
1
Kubernetes specification that can be used to control traffic between pods.
- Overlay Networks
1
An overlay network abstracts a physical (underlay) network to create virtual network. It provides simpler interface by hiding complexities of the underlay.
- VXLAN
1
2
3
4
5
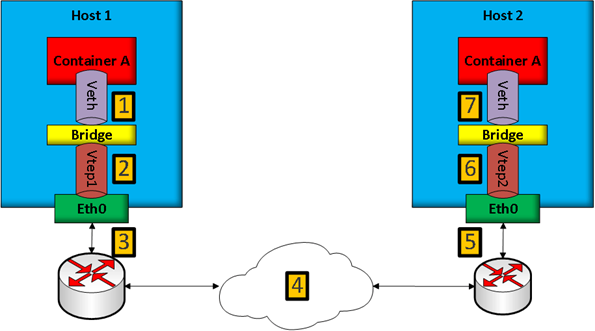
6VXLAN is a network tunneling(隧道) protocol in the Linux Kernel. Network tunneling means hiding protocol (VXLAN) within another protocol (TCP/IP).VXLAN tuneels layer 2 frames inside of Layer 4 UDP datagrams.
# Linux network structure in VXLAN:
- veth: Virtual ethernet pair, it connects network namespaces
- bridge: It is used to connect ethernet pairs in Linux
- vtep: VXLAN tunnel endpoint, it's entry/exit point for VXLAN tunnels - BGP(Border gateway protocol) - 边界网关协议
- BPF(Berkeley Packet Filter) - 伯克利数据包过滤器
- XDP (eXpress Data Path)
1
XDP is a data path recently added to Linux kernel. It relies on eBPF to perform fast packet processing.
- kube-proxy
- Terminology
kubernetes安装Metrics Server
1
2
3
4
5
6
7
8
9> Metrics Server是集群中资源使用情况的聚合器, Metrics Server从kubelets收集资源指标,并通过Metrics API将他们暴露在Kubernetes apiserver中,以供Horizontal Pod Autoscaler和Vertical Pod Autoscaler使用.
> Metrics Server不适用与非自动缩放目的,不要使用他将指标转发到监控解决方案,或作为监控解决方案指标的来源,这种情况可以使用kuberlet/metrics/resource 端点收集指标
# Installation
- kubectl apply -f https://github.com/kubernetes-sigs/metrics-server/releases/latest/download/components.yaml
# Fix: (cannot validate certificate, doesn't contain any IP SANs)
- $ kubectl edit deployment metrics-server -n kube-system
> modifying the metrics-server deployment template, and adding the argument - --kubelet-insecure-tls to the container argsKubernetes集群安装Dashboard
1
2
3
4
5
6
7
8
9
10
11
12
13
14
15
16
17
18
19
20
21
22
23
24
25
26
27
28# Dashboard(Web界面) 可视化插件
➜ wget kubectl apply -f https://raw.githubusercontent.com/kubernetes/dashboard/v2.2.0/aio/deploy/recommended.yaml
namespace/kubernetes-dashboard created
serviceaccount/kubernetes-dashboard created
service/kubernetes-dashboard created
secret/kubernetes-dashboard-certs created
secret/kubernetes-dashboard-csrf created
secret/kubernetes-dashboard-key-holder created
configmap/kubernetes-dashboard-settings created
role.rbac.authorization.k8s.io/kubernetes-dashboard created
clusterrole.rbac.authorization.k8s.io/kubernetes-dashboard created
rolebinding.rbac.authorization.k8s.io/kubernetes-dashboard created
clusterrolebinding.rbac.authorization.k8s.io/kubernetes-dashboard created
deployment.apps/kubernetes-dashboard created
service/dashboard-metrics-scraper created
Warning: spec.template.metadata.annotations[seccomp.security.alpha.kubernetes.io/pod]: deprecated since v1.19; use the "seccompProfile" field instead
deployment.apps/dashboard-metrics-scraper created
# 查看Dashboard对应的Pod状态
➜ kubectl get pods -n kubernetes-dashboard
NAME READY STATUS RESTARTS AGE
dashboard-metrics-scraper-856586f554-w4vvw 1/1 Running 0 5m19s
kubernetes-dashboard-78c79f97b4-l8nmb 1/1 Running 0 5m19s
# 命令行代理 kubectl 访问DashBoard
$ kubectl proxy --address='0.0.0.0' --port=8001 --accept-hosts='.*'
# 从集群外部访问Dashboard 需要使用IngressKubernetes部署存储插件
1
2
3
4
5
6
7
8
9
10
11
12
13
14
15
16
17
18
19
20
21
22
23
24
25
26> 容器持久化存储,用来保存容器存储状态,存储插件会在容器中挂在一个基于网络或者其他机制的远程数据卷. 使得在容器里创建的文件,实际上保存在远程存储服务器上,
# Kubernetes 存储插件 - Rook
> Rook项目是一个基于Ceph的Kubernetes存储插件,不同于Ceph的简单封装,Rook加入了对平扩展、迁移、灾难备份、监控等大量的企业级功能.
- 部署基于Rook持久化存储集群以容器方式运行
$ git clone --single-branch --branch release-1.7 https://github.com/rook/rook.git
cd rook/cluster/examples/kubernetes/ceph
kubectl create -f crds.yaml -f common.yaml -f operator.yaml
kubectl create -f cluster.yaml
- 查看Rook部署的Namespace
➜ k get pods -n rook-ceph
NAME READY STATUS RESTARTS AGE
csi-cephfsplugin-7l9xb 3/3 Running 0 15m
csi-cephfsplugin-provisioner-689686b44-qpt5q 6/6 Running 0 15m
csi-rbdplugin-provisioner-5775fb866b-25224 6/6 Running 0 15m
csi-rbdplugin-vvq94 3/3 Running 0 15m
rook-ceph-operator-7bdb744878-zz2fm 1/1 Running 0 24m
> Kubernetes项目创建的所有Pod就能够通过Persistent Volume (PV) 和 Persistent Volume Claim (PVC) 的方式,在容器里挂载由Ceph提供的数据卷
- Storage
- Block: Create block storage to be consumed by a pod (RWO)
> Before Rook can provision storage, a **StorageClass** and **CephBlockPool** need to be created.
- Shared FileSystem: Create a filesystem to be shared across multiple pods (RWX)
- Object: Create an object store that is accessible inside or outside the Kubernetes clusterHELM
1
2
3
4
5
6
7
8
9
10
11> Helm is the package manager for Kubernetes
# Helm 三大概念
- Chart: helm包
> 包含Kubernetes集群内部运行应用程序,工具或服务所需的所有资源定义
- Repository: 仓库
> 存放和共享charts
- Release:
> 运行在Kubernetes集群中的chart实例
# helm search - 查找Charts
Kubernetes IN Docker (Kind)
local clusters for testing Kubernetes
1 | # Installation |
容器化应用
- Kubernetes API 对象定义
1
2
3
4
5
6
7
8
9
10
11
12
13
14
15
16
17
18
19
20
21
22
23
24
25
26
27
28
29
30> Kubernetes 不推荐使用命令行方式直接运行容器(kubectl run), 而是希望使用YAML方式(kubectl create -f yaml)
> 使用一个API对象(Deployment)管理另一种API对象(Pod)的方式叫做“控制器”模式 (Controller pattern)
> Pod 是Kubernetes世界里的“应用”,而一个应用可以由多个容器组成.
- metadata: API对象的元数据
- spec: 描述它要表达的功能
- labels: 一组key-value格式的标签
- spec.selector.matchLabels: Label Selector 标签选择器
- annotations: 一组key-value格式的内部信息(kubernetes组件本身感兴趣, 在Kubernetes运行过程中被自动加载到API对象上)
➜ k get pods -l app=nginx
NAME READY STATUS RESTARTS AGE
nginx-deployment-5d59d67564-8qtq5 1/1 Running 0 11m
nginx-deployment-5d59d67564-xx29g 1/1 Running 0 11m
$ k apply -f nginx-deployment.yaml
$ k exec -it nginx-deployment-748c6fff66-plhwq -- /bin/bash
$ k delete -f nginx-deployment.yaml
> 不显式声明宿主主机目录的Volume,Kubernetes会在宿主主机上创建一个临时目录,这个目录会被绑定到容器所声明的Volume目录上(Kubernetes的emptyDir类型,只是把kubernetes创建的临时目录作为Volume宿主机目录,交给Docker)
> 显式的Volume定义
...
volumes:
- name: nginx-vol
hostPath:
path: " /var/data" - Pod实现原理
1
2
3
4
5
6
7
8
9
10
11Pod是Kuberntes项目的原子调度单位,kubernetes项目的调度器是统一按照Pod而非容器的资源需求进行计算
Docker容器的本质"Namespace隔离,Cgroups限制,rootfs文件系统"
Pod是Kubernetes里院子调度单位,Kubernetes项目的调度器是统一按照Pod而非容器的资源需求进行计算.
# 展示系统中正在运行的进程树状结构
$ pstree - display a tree of process
容器的"单进程模型"并不是指容器里只能运行"一个"进程,而是指容器没有管理多个进程的能力,
Pod在Kubernetes项目里“容器设计模型”
Pod其实是一组共享了某些资源的容器;Pod里的所有容器共享的是一个Network Namespace,并且可以声明共享一个Volume.
Pod实际上扮演传统基础设施里"虚拟机"的角色,而容器则是这个虚拟机里运行的用户程序- Pod Infra容器
1
2
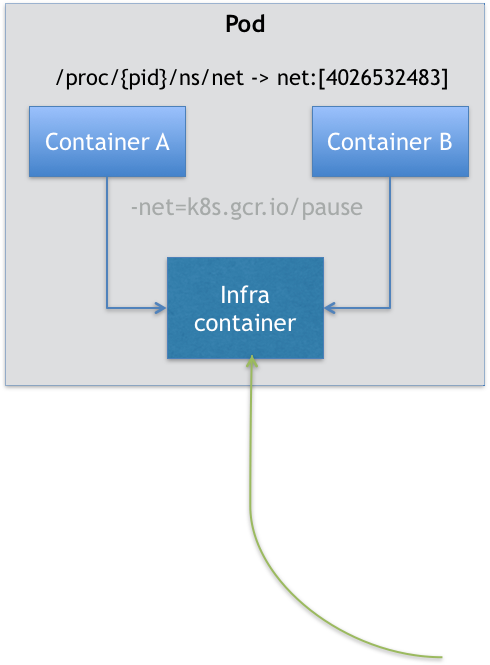
3Kubernetes项目中Pod实现使用一个中间容器,这个容器叫做Infra容器,在Pod中,Infra容器都是第一个被创建的容器
Infra 容器使用k8s.gcr.io/pause镜像使用汇编语言编写,永远处于"暂停"状态的容器,解压后大小只有100~200KB
Pod声明周期只跟Infra容器一致,而与容器A和B无关 - 容器设计模式
1
2
3
4
5sidecar
我们可以在一个Pod中启动一个辅助容器,来完成一些独立主容器之外的工作
Istio - 微服务治理项目
使用sidecar容器完成微服务治理的原理
- Pod Infra容器
- 深入解析Pod对象(-): 基本概念
1
2
3
4
5
6
7
8
9
10
11
12
13
14
15
16
17
18
19
20
21
22
23
24
25
26
27
28
29
30
31
32
33
34
35
36
37
38
39
40
41
42
43
44
45
46
47
48
49
50> Kubernetes 项目的最小编排单元 "Pod"
> Pod扮演的是传统部署环境里"虚拟机"的角色
# Pod属性
- 调度、网络、存储、安全
- NodeSelector (将Pod与Node进行绑定的字段)
- NodeName: (调度的结果)
- 凡是Pod中的容器要共享宿主机的Namespace,一定是Pod级别的定义
# Container属性
- ImagePullPolicy: 镜像拉取策略
# Pod对象在Kubernetes中的声明周期
- phase:
- Pending: Pod的YAML文件已经提交Kubernetes, API对象已经被创建保存在Etcd当中
- Running: Pod已经调度成功,与具体节点绑定
- Succeeded: Pod中所有容器都正常运行完毕,并且已经退出
- Failed: Pod中至少有一个容器以不正常的状态退出
- Unknown: Pod状态不能持续被kubelet上报给kube-apiserver
- status.condation
- PodScheduled:
- Initialized
- Ready
- ContainersReady
# Volume
- Projected Volume
- Secret: 加密数据存放在Etcd,通过Pod容器挂载Volume方式访问Secret,Secret对象存储数据经过base64转码
- ConfigMap: 保存不需要加密、应用所需的配置信息
- Downward API: 直接获取Pod API 对象本身的信息
- spec.nodeName: 宿主机名字
- status.hostIP: 宿主机IP
- metadata.name: Pod名字
- metadata.namespace: Pod的Namespace
- status.podIP: Pod的IP
- spec.serviceAccountName:
- metadata.uid
- metadata.labels
- metadata.annotations
- metadata.labels
- metadata.annotations
- ServiceAccountToken
> Service Account对象是Kubernetes系统内置的一种"服务账户",是Kubernetes进行权限分配的对象
环境变量获取信息的方式不具备自动更新的能力,建议使用Volume文件的方式获取这些信息
这种把Kubernetes客户端以容器的方式运行在集群里,然后使用default Service Account自动授权的方式,称作"InClusterConfig",Kubernetes API编程的授权方式
# 容器健康检查和恢复机制
- Probe(探针)
> Kubernetes中并没有Docker的Stop,虽然是Restart,
Kubernetes 技能图谱
Awesome Tools
WarmUp
- 一旦要追求项目的普适性,那就一定要从顶层开始做好设计
专业术语
- PaaS (Platform as a Service): 平台即服务
- BaaS (Backend as a Service): 后端即服务
- GA (General Availability): 一般可用性